Erfahre, wie du ein 2×16 LCD Display mit dem Raspberry Pi Pico verbindest und programmierst. In dieser Schritt-für-Schritt-Anleitung lernst du, wie du Texte und Daten auf dem Display anzeigst – einfach erklärt mit Schaltplan und vollständigem Code!
Was brauchst du?
Hinweis
Wir verwenden in diesem Tutorial ein LCD-Display mit integrierter I2C-Schnittstelle. Man benötigt für die Verbindung dann nur 4 Kabel und kann das Display sehr einfach mit der I2C-Bibliothek ansteuern.
Es gibt auch LCD-Displays ohne I2C-Schnittstelle. Dadurch wird die Verkabelung und Programmierung etwas komplizierter, man hat aber auch noch mehr Kontrolle über das Display – für die aller meisten Anwendungen braucht man das aber nicht!
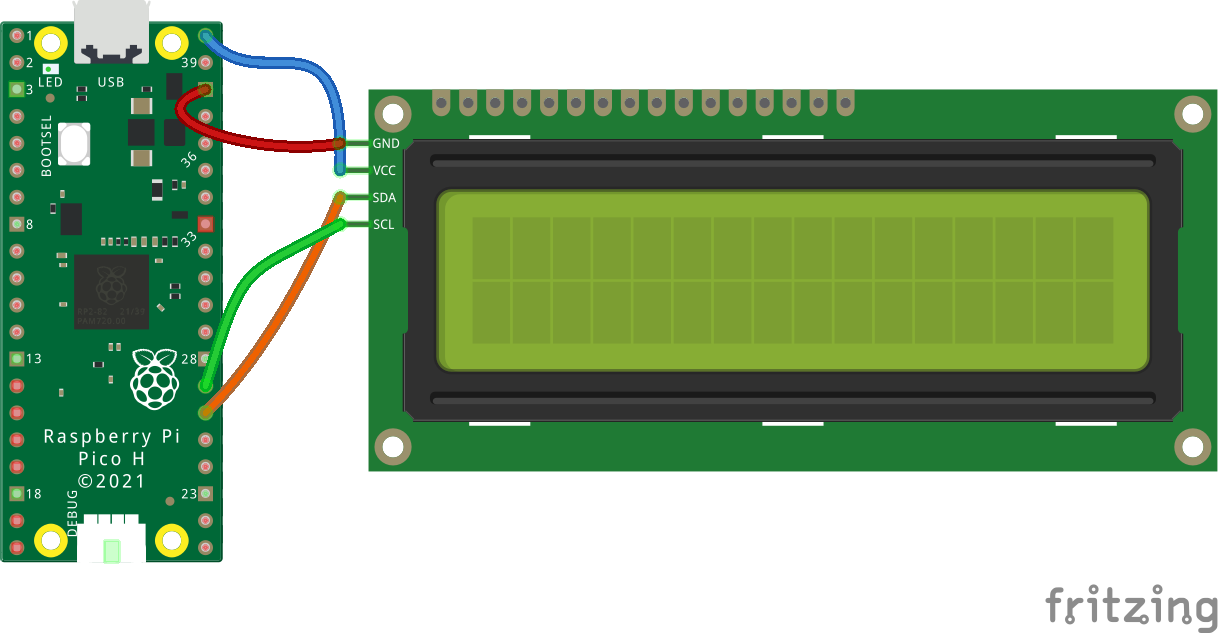
Schritt 1: LCD-Display mit dem Pi Pico verbinden
Das LCD-Display mit I2C-Schnittstelle hat 4 Anschlüsse – 2 für die Stromversorgung und 2 für die Daten, die man auf dem Display darstellen möchte. Zunächst einmal stellen wir die Stromversorgung her:
- Den Ground-Anschluss des LCD-Displays (GND) verbindest du mit einem beliebigen Ground-Anschluss des Pi Picos (z. B. Pin 38).
- Den VCC-Anschluss des LCD-Display verbindest du mit der Spannungsversorgung VBUS des Pi Picos.
Das Display sollte nun bereits leuchten, es wird jedoch noch nichts angezeigt. Das LCD-Display läuft über die I2C-Schnittstelle. Hierfür müssen wir noch eine SCL-Verbindung (Clock) und eine SDA-Verbindung (Daten) herstellen:
- Den SDA-Anschluss des LCD-Display verbindest du mit einem beliebigen SDA-Anschluss des Pi Picos (z. B. Pin 26 / GP20)
- Den SCL-Anschluss des LCD-Display verbindest du mit einem beliebigen SCL-Anschluss des Pi Picos (z. B. Pin 27 / GP21)
Schritt 2: Module einbinden
Da das LCD-Display über die I2C-Schnittstelle läuft, muss man Module auf den Raspberry Pi Pico laden, um das Display einfach bedienen zu können. Die folgenden beiden Module heißen lcd_api.py und machine_i2c_lcd.py
Du kannst den Inhalt kopieren und jeweils als .py-Datein auf dem Pi Pico speichern!
"""Provides an API for talking to HD44780 compatible character LCDs."""

import time

class LcdApi:
    """Implements the API for talking with HD44780 compatible character LCDs.
    This class only knows what commands to send to the LCD, and not how to get
    them to the LCD.

    It is expected that a derived class will implement the hal_xxx functions.
    """

    # The following constant names were lifted from the avrlib lcd.h
    # header file, however, I changed the definitions from bit numbers
    # to bit masks.
    #
    # HD44780 LCD controller command set

    LCD_CLR = 0x01              # DB0: clear display
    LCD_HOME = 0x02             # DB1: return to home position

    LCD_ENTRY_MODE = 0x04       # DB2: set entry mode
    LCD_ENTRY_INC = 0x02        # --DB1: increment
    LCD_ENTRY_SHIFT = 0x01      # --DB0: shift

    LCD_ON_CTRL = 0x08          # DB3: turn lcd/cursor on
    LCD_ON_DISPLAY = 0x04       # --DB2: turn display on
    LCD_ON_CURSOR = 0x02        # --DB1: turn cursor on
    LCD_ON_BLINK = 0x01         # --DB0: blinking cursor

    LCD_MOVE = 0x10             # DB4: move cursor/display
    LCD_MOVE_DISP = 0x08        # --DB3: move display (0-> move cursor)
    LCD_MOVE_RIGHT = 0x04       # --DB2: move right (0-> left)

    LCD_FUNCTION = 0x20         # DB5: function set
    LCD_FUNCTION_8BIT = 0x10    # --DB4: set 8BIT mode (0->4BIT mode)
    LCD_FUNCTION_2LINES = 0x08  # --DB3: two lines (0->one line)
    LCD_FUNCTION_10DOTS = 0x04  # --DB2: 5x10 font (0->5x7 font)
    LCD_FUNCTION_RESET = 0x30   # See "Initializing by Instruction" section

    LCD_CGRAM = 0x40            # DB6: set CG RAM address
    LCD_DDRAM = 0x80            # DB7: set DD RAM address

    LCD_RS_CMD = 0
    LCD_RS_DATA = 1

    LCD_RW_WRITE = 0
    LCD_RW_READ = 1

    def __init__(self, num_lines, num_columns):
        self.num_lines = num_lines
        if self.num_lines > 4:
            self.num_lines = 4
        self.num_columns = num_columns
        if self.num_columns > 40:
            self.num_columns = 40
        self.cursor_x = 0
        self.cursor_y = 0
        self.implied_newline = False
        self.backlight = True
        self.display_off()
        self.backlight_on()
        self.clear()
        self.hal_write_command(self.LCD_ENTRY_MODE | self.LCD_ENTRY_INC)
        self.hide_cursor()
        self.display_on()

    def clear(self):
        """Clears the LCD display and moves the cursor to the top left
        corner.
        """
        self.hal_write_command(self.LCD_CLR)
        self.hal_write_command(self.LCD_HOME)
        self.cursor_x = 0
        self.cursor_y = 0

    def show_cursor(self):
        """Causes the cursor to be made visible."""
        self.hal_write_command(self.LCD_ON_CTRL | self.LCD_ON_DISPLAY |
                               self.LCD_ON_CURSOR)

    def hide_cursor(self):
        """Causes the cursor to be hidden."""
        self.hal_write_command(self.LCD_ON_CTRL | self.LCD_ON_DISPLAY)

    def blink_cursor_on(self):
        """Turns on the cursor, and makes it blink."""
        self.hal_write_command(self.LCD_ON_CTRL | self.LCD_ON_DISPLAY |
                               self.LCD_ON_CURSOR | self.LCD_ON_BLINK)

    def blink_cursor_off(self):
        """Turns on the cursor, and makes it no blink (i.e. be solid)."""
        self.hal_write_command(self.LCD_ON_CTRL | self.LCD_ON_DISPLAY |
                               self.LCD_ON_CURSOR)

    def display_on(self):
        """Turns on (i.e. unblanks) the LCD."""
        self.hal_write_command(self.LCD_ON_CTRL | self.LCD_ON_DISPLAY)

    def display_off(self):
        """Turns off (i.e. blanks) the LCD."""
        self.hal_write_command(self.LCD_ON_CTRL)

    def backlight_on(self):
        """Turns the backlight on.

        This isn't really an LCD command, but some modules have backlight
        controls, so this allows the hal to pass through the command.
        """
        self.backlight = True
        self.hal_backlight_on()

    def backlight_off(self):
        """Turns the backlight off.

        This isn't really an LCD command, but some modules have backlight
        controls, so this allows the hal to pass through the command.
        """
        self.backlight = False
        self.hal_backlight_off()

    def move_to(self, cursor_x, cursor_y):
        """Moves the cursor position to the indicated position. The cursor
        position is zero based (i.e. cursor_x == 0 indicates first column).
        """
        self.cursor_x = cursor_x
        self.cursor_y = cursor_y
        addr = cursor_x & 0x3f
        if cursor_y & 1:
            addr += 0x40    # Lines 1 & 3 add 0x40
        if cursor_y & 2:    # Lines 2 & 3 add number of columns
            addr += self.num_columns
        self.hal_write_command(self.LCD_DDRAM | addr)

    def putchar(self, char):
        """Writes the indicated character to the LCD at the current cursor
        position, and advances the cursor by one position.
        """
        if char == '\n':
            if self.implied_newline:
                # self.implied_newline means we advanced due to a wraparound,
                # so if we get a newline right after that we ignore it.
                self.implied_newline = False
            else:
                self.cursor_x = self.num_columns
        else:
            self.hal_write_data(ord(char))
            self.cursor_x += 1
        if self.cursor_x >= self.num_columns:
            self.cursor_x = 0
            self.cursor_y += 1
            self.implied_newline = (char != '\n')
        if self.cursor_y >= self.num_lines:
            self.cursor_y = 0
        self.move_to(self.cursor_x, self.cursor_y)

    def putstr(self, string):
        """Write the indicated string to the LCD at the current cursor
        position and advances the cursor position appropriately.
        """
        for char in string:
            self.putchar(char)

    def custom_char(self, location, charmap):
        """Write a character to one of the 8 CGRAM locations, available
        as chr(0) through chr(7).
        """
        location &= 0x7
        self.hal_write_command(self.LCD_CGRAM | (location << 3))
        self.hal_sleep_us(40)
        for i in range(8):
            self.hal_write_data(charmap[i])
            self.hal_sleep_us(40)
        self.move_to(self.cursor_x, self.cursor_y)

    def hal_backlight_on(self):
        """Allows the hal layer to turn the backlight on.

        If desired, a derived HAL class will implement this function.
        """
        pass

    def hal_backlight_off(self):
        """Allows the hal layer to turn the backlight off.

        If desired, a derived HAL class will implement this function.
        """
        pass

    def hal_write_command(self, cmd):
        """Write a command to the LCD.

        It is expected that a derived HAL class will implement this
        function.
        """
        raise NotImplementedError

    def hal_write_data(self, data):
        """Write data to the LCD.

        It is expected that a derived HAL class will implement this
        function.
        """
        raise NotImplementedError

    # This is a default implementation of hal_sleep_us which is suitable
    # for most micropython implementations. For platforms which don't
    # support `time.sleep_us()` they should provide their own implementation
    # of hal_sleep_us in their hal layer and it will be used instead.
    def hal_sleep_us(self, usecs):
        """Sleep for some time (given in microseconds)."""
time.sleep_us(usecs) # NOTE this is not part of Standard Python library, specific hal layers will need to override thisfrom lcd_api import LcdApi
from time import sleep_ms
# The PCF8574 has a jumper selectable address: 0x20 - 0x27
DEFAULT_I2C_ADDR = 0x27
# Defines shifts or masks for the various LCD line attached to the PCF8574
MASK_RS = 0x01
MASK_RW = 0x02
MASK_E = 0x04
SHIFT_BACKLIGHT = 3
SHIFT_DATA = 4
class I2cLcd(LcdApi):
"""Implements a HD44780 character LCD connected via PCF8574 on I2C."""
def __init__(self, i2c, i2c_addr, num_lines, num_columns):
self.i2c = i2c
self.i2c_addr = i2c_addr
self.i2c.writeto(self.i2c_addr, bytearray([0]))
sleep_ms(20) # Allow LCD time to powerup
# Send reset 3 times
self.hal_write_init_nibble(self.LCD_FUNCTION_RESET)
sleep_ms(5) # need to delay at least 4.1 msec
self.hal_write_init_nibble(self.LCD_FUNCTION_RESET)
sleep_ms(1)
self.hal_write_init_nibble(self.LCD_FUNCTION_RESET)
sleep_ms(1)
# Put LCD into 4 bit mode
self.hal_write_init_nibble(self.LCD_FUNCTION)
sleep_ms(1)
LcdApi.__init__(self, num_lines, num_columns)
cmd = self.LCD_FUNCTION
if num_lines > 1:
cmd |= self.LCD_FUNCTION_2LINES
self.hal_write_command(cmd)
def hal_write_init_nibble(self, nibble):
"""Writes an initialization nibble to the LCD.
This particular function is only used during initialization.
"""
byte = ((nibble >> 4) & 0x0f) << SHIFT_DATA
self.i2c.writeto(self.i2c_addr, bytearray([byte | MASK_E]))
self.i2c.writeto(self.i2c_addr, bytearray([byte]))
def hal_backlight_on(self):
"""Allows the hal layer to turn the backlight on."""
self.i2c.writeto(self.i2c_addr, bytearray([1 << SHIFT_BACKLIGHT]))
def hal_backlight_off(self):
"""Allows the hal layer to turn the backlight off."""
self.i2c.writeto(self.i2c_addr, bytearray([0]))
def hal_write_command(self, cmd):
"""Writes a command to the LCD.
Data is latched on the falling edge of E.
"""
byte = ((self.backlight << SHIFT_BACKLIGHT) | (((cmd >> 4) & 0x0f) << SHIFT_DATA))
self.i2c.writeto(self.i2c_addr, bytearray([byte | MASK_E]))
self.i2c.writeto(self.i2c_addr, bytearray([byte]))
byte = ((self.backlight << SHIFT_BACKLIGHT) | ((cmd & 0x0f) << SHIFT_DATA))
self.i2c.writeto(self.i2c_addr, bytearray([byte | MASK_E]))
self.i2c.writeto(self.i2c_addr, bytearray([byte]))
if cmd <= 3:
# The home and clear commands require a worst case delay of 4.1 msec
sleep_ms(5)
def hal_write_data(self, data):
"""Write data to the LCD."""
byte = (MASK_RS | (self.backlight << SHIFT_BACKLIGHT) | (((data >> 4) & 0x0f) << SHIFT_DATA))
self.i2c.writeto(self.i2c_addr, bytearray([byte | MASK_E]))
self.i2c.writeto(self.i2c_addr, bytearray([byte]))
byte = (MASK_RS | (self.backlight << SHIFT_BACKLIGHT) | ((data & 0x0f) << SHIFT_DATA))
self.i2c.writeto(self.i2c_addr, bytearray([byte | MASK_E]))
self.i2c.writeto(self.i2c_addr, bytearray([byte]))Schritt 3: Initialisierung des LCD-Displays
Nun kann das LCD-Display initialisiert werden. Dafür werden zunächst die notwendigen Module importiert. Anschließend wird eine I2C-Verbindung vom Raspberry Pi Pico zum Display hergestellt.
# Module importieren
from machine import I2C, Pin
from machine_i2c_lcd import I2cLcd

# I2C-Initialisierung
i2c = I2C(0, sda=Pin(20), scl=Pin(21), freq=100000)

# Initialisierung des LCD-Displays
address = i2c.scan()[0]
lcd = I2cLcd(i2c, address, 2, 16)
Kurze Erklärung:
i2c = I2C(0, sda=Pin(20), scl=Pin(21), freq=100000): Initialisiert I2C auf Pin 20 (SDA) und Pin 21 (SCL) mit 100 kHz.address = i2c.scan()[0]: Findet die Adresse des angeschlossenen LCD-Displays.lcd = I2cLcd(i2c, address, 2, 16): Initialisiert das LCD mit 2 Zeilen und 16 Zeichen.
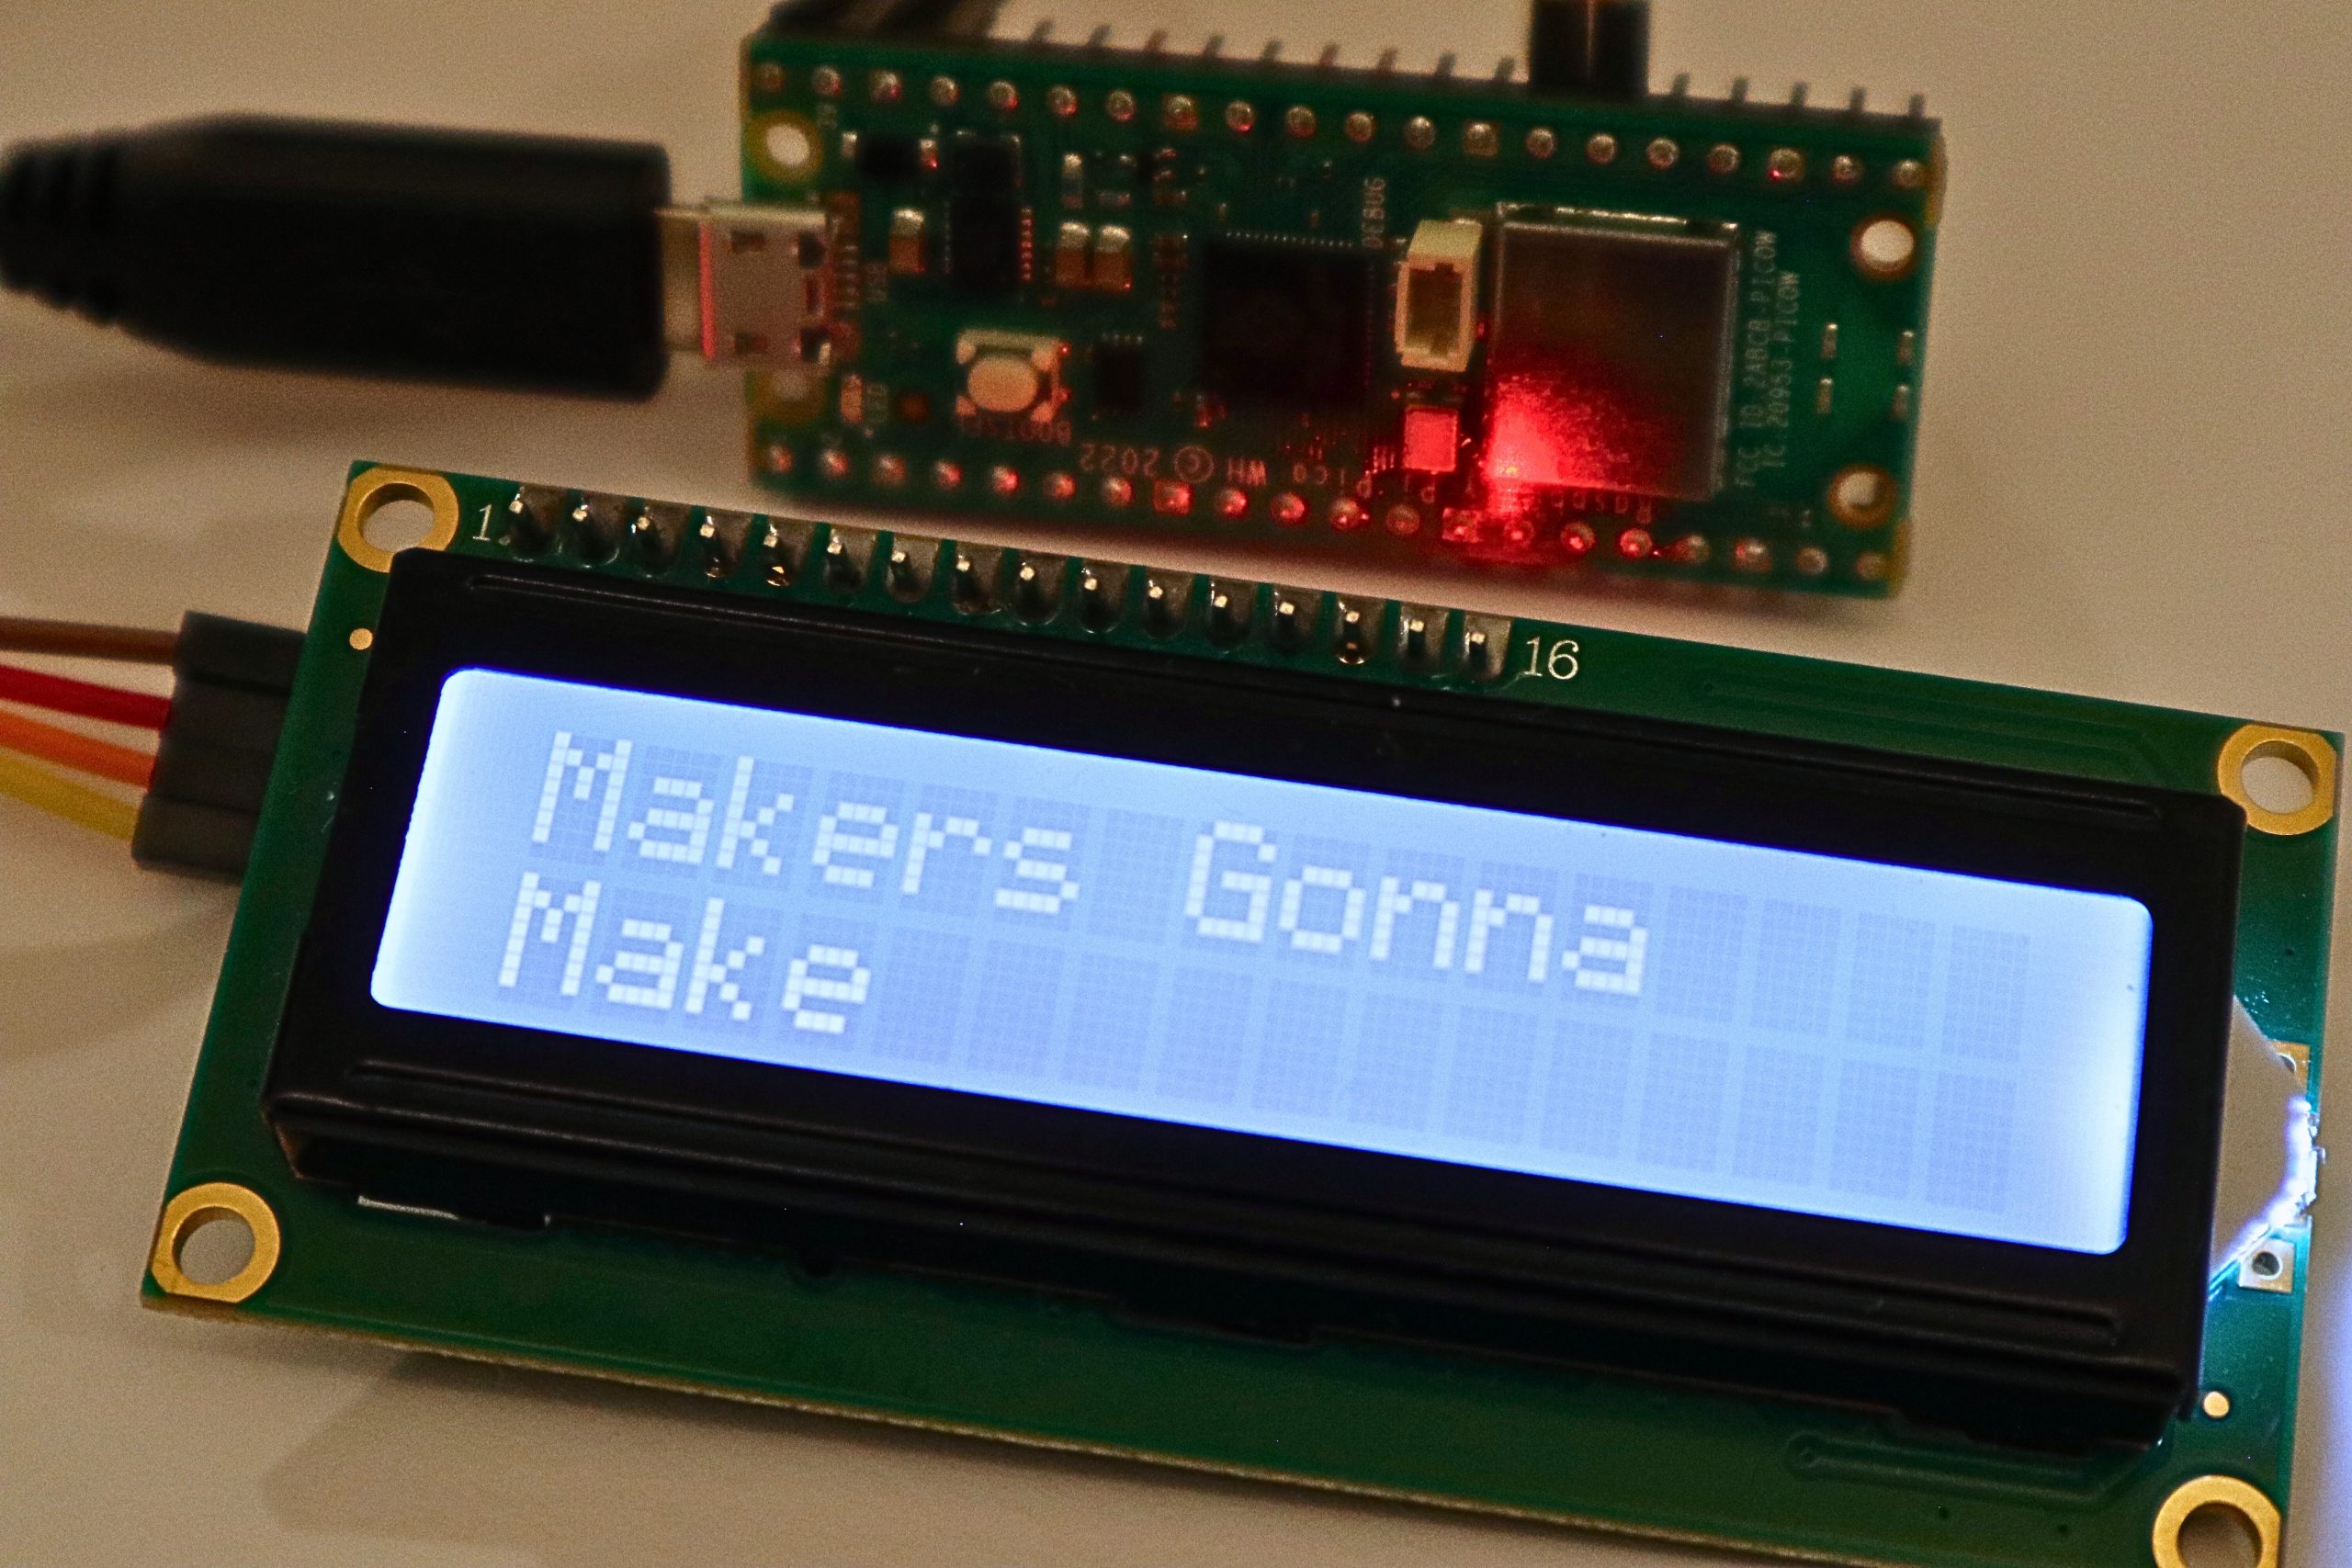
Schritt 4: Text auf dem LCD-Display ausgeben
Mit den folgenden Code-Zeilen lässt sich nun ganz einfach Text auf dem LCD-Display ausgeben:
zeile1 = "Makers Gonna"
zeile2 = "Make"
lcd.putstr(zeile1 + "\n" + zeile2)
Schritt 5: Einzelnes Zeichen ausgeben
Alternativ kann auch an einer bestimmten Stelle des LCD-Displays ein einzelnes Zeichen ausgegeben werden. Ersetzt man „spalte“ und „zeile“ durch Zahlen, wird an der entsprechenden Stelle ein „x“ ausgegeben.
lcd.move_to(spalte, zeile)
lcd.putstr("x")
Schritt 5: Display-Inhalt löschen
Mit der clear()-Funktion lässt sich der ausgegebene Inhalt auf dem LCD-Display wieder löschen:
lcd.clear()Schritt 6: Hintergrund-Licht steuern
Das Hintergrund-Licht des LCD-Displays kann man an und ausschalten. Die eingebundenen Module liefern dafür einfach zu bedienende Funktionen:
# Hintergrund-Licht ausschalten
lcd.backlight_off()

# Hintergrund-Licht einschalten
lcd.backlight_on()
Schritt 7: Display ein- und ausschalten
Schließlich lässt sich auch das LCD-Display selbst ein- und ausschalten. Auch hierfür gibt es einfach zu verwendende Funktionen:
# Display ausschalten
lcd.display_off()

# Display einschalten
lcd.display_on()
Vollständiger Code
Der folgende Beispiel-Code durchläuft nacheinander die verschiedenen Möglichkeiten, die man mit dem LCD-Display hat!
Tipp: Zum programmieren kannst du zum Beispiel die kostenlose Programmierumgebung Thonny verwenden!
# Module importieren
from utime import sleep
from machine import I2C, Pin
from machine_i2c_lcd import I2cLcd

# I2C-Initialisierung
i2c = I2C(0, sda=Pin(20), scl=Pin(21), freq=100000)

# Initialisierung des LCD-Displays
address = i2c.scan()[0]
lcd = I2cLcd(i2c, address, 2, 16)

# Text ausgeben
zeile1  = "Makers Gonna"
zeile2 = "Make"
lcd.putstr(zeile1 + "\n" + zeile2)
sleep(1)

# Display-Inhalt löschen
lcd.clear()
sleep(1)

# Hintergrund-Licht ausschalten
lcd.clear()
lcd.putstr("backlight\n" + "off")
sleep(1)
lcd.backlight_off()
sleep(1)

# Hintergrund-Licht einschalten
lcd.clear()
lcd.putstr("backlight\n" + "on")
lcd.backlight_on()
sleep(1)

# Display ausschalten
lcd.clear()
lcd.putstr("display\n" + "off")
sleep(1)
lcd.display_off()
sleep(1)

# Display einschalten
lcd.clear()
lcd.putstr("display\n" + "on")
lcd.display_on()
sleep(1)

# Text erneut ausgeben
lcd.clear()
zeile1  = "Makers Gonna"
zeile2 = "Make"
lcd.putstr(zeile1 + "\n" + zeile2)
Fazit
Das I2C LCD-Display lässt sich einfach programmieren und ist für viele Anwendungen super nützlich! So kann man sich Text oder Zahlen ganz einfach direkt anzeigen lassen und nicht nur am PC auf der Konsole!
Hier findest du auf dem Blog weitere spannende Raspberry Pi Pico Projekte!